Friday 27 March 2009

Muslin continued

Now this really annoys me because I spent a lot of time on this fitting so that the blouse would not pull towards the back......this is one of the reasons why I am pleased I sew, I can't get a nice fit on RTW tops because of this problem........so I am not happy about it, it may be the way I am standing.
I am finished fitting the muslin now, I think I have done the best I can so I will have to live with the rest.....I can get on with the best part now. Not tonight though because I am going bowling..well watching mostly lol lol.
I have a few issues with the back of the sleeve but I can live with them.

I don't think the front looks too bad considering I have pressed and pulled this muslin about....the sleeve isn't the right length, I ran out of fabric so this is as long as a sleeve as I could get out of the length that I had. The sleeve has a cuff or another variation is a pleat and a button, I don't know which yet. This is a dropped shoulder, I don't know if it looks right or not I can't make my mind up....I love the relaxed fit though.

Thursday 26 March 2009

Muslin.....ugh

I took 1/4" out of the neckline. Before I did all of these adjustments I fitted the whole of the blouse with darts, back and front, but there was nothing left of the relaxed style that I like so I took it all to bits and started again..... so it has taken me forever to do these adjustments....these are the ones I have ended up with and are the best I can do to keep the style. I have tried every permutation, taking in, letting out, trying on, taking off and nearly tearing my hair out lol lol. I have actually tried a sleeve in and they are going to take a while to fit....wish me luck.

The neckline on the front is slightly off grain, all the grain lines are where they should be though, I shortened the waist by 1/2", I still think it needs to be shortened a bit more.

This is a straight seam blouse with no shaping at all, my clothes have to have shaping in the back otherwise they will end up looking like the blouse in the picture below.....having said that, I didn't want a fitted blouse. I ended up putting a couple of darts either side of the centre back seam, just gently shaping them, so it isn't fitted. I tried just adjusting the centre back seam...there wasn't enough shape for my curved spine, I tried every shape of dart and this is the best shape I could get without being too fitted. It actually looks as if it is too big just underneath the armhole but believe me if I had taken it in any further I will not be able to move my arms. I am hoping when I get the sleeves in it will be alright.

The back....what is right with it, I took the waist up 1/2" then I did a sway back alteration by taking the middle of the waist up 1/2" and tapering to nothing at the side seams.

Here is my first attempt at putting my muslin right...I took a 3/4" dart at the armhole because it was gaping because of my bust and transfered it to the bust dart, making the bust dart biggar, that worked quite well. I then brought the shoulder seams forward 1/2" to accomodate my forward shoulder.

Wednesday 18 March 2009

Calvin Klein Blouse

This Calvin Klein pattern I've had for years and have never tried it (as you do) but I thought I would give it a go. I am doing view C, I love simple, uncomplicated styles because my body shape is so comlicated to fit. Behind the pattern in the photograph is the fabric I am planning to use, it is a white polyester charmeuse at £7 a metre.I originally bought it for a couple of camisole tops but I am going to use it for this blouse. When I make my test garment I will find out if this blouse looks old fashioned, if it does I will try and bring it up to date.... maybe make it shorter or whatever..... or I will scrap it.
Right my alterations even before I make my test garment. This blouse has no dart so first of all I have added my dart, then do a 1" FBA using the Sandra Betzina method, I know I could do it altogether but I like it this way. I then had to make my dart longer because of the FBA. I also made my shoulder seams I" wide because I always have trouble there. My waist was lowered when putting in the dart so I didn't have to do that.
So up to now I have got my bust line and waist in the right place, my dart's in and it is the right length and enough room in the shoulder area for alteration. The back... (no photograph) I have put a 5/8" seam in the centre back and added 1/4" extra at about 5" from the top to allow for my rounded back. I have also lowered the waist 2" to bring it in line with the front I know I will have to alter at the waistline for a sway back during the musin fitting, I have also made a 1" seam at the shoulders to allow for alteration. Here is my test garment waiting to be made up and be fitted, I know there will be a lot of work involved. I only have a limited amount of sewing time, as I am sure everyone has, so it will take me a while.

Thursday 12 March 2009

Scarf


After doing the alterations to my blouse and while I still had the thread in the machine, I decided to use some of the fabric that is left to make a scarf. I just tore a strip to keep it on the grain and hemmed the edges. It keeps my neck warm when I have got a v necked jumper on.
Better than wasting the left over fabric, I'm all for saving especially at this time.

Wednesday 11 March 2009

New purchases

Last but not least mundane things like zips and basting thread. I have never used proper basting thread before...I just use embroidery silks mainly, it's nice and soft and easy to pull out. I got a shock at this it is almost like very soft string a lot finer though.
These were my puchases which cost me about £200.....will they be worth it, I shall have to wait and see. I am badly in need of a new pair of pinking shears, I have had my last pair for about 30 years. Before I had an overlocker I used to widen my seams and pink them to stop them fraying. The left handed shears..well I have to buy them when I see them because they are also like hen's teeth to find.


These are studs and buttons for jeans like trousers, I got them for the brown needlecord fabric. I got 3 metres of that fabric so I am hoping to get 2 pairs of trousers out of it. I will use my Vogue basic trouser pattern and narrow the legs, hopefully change the pockets and put the studs in and hey presto......it's easy said, isn't it.


I absolutely love this fabric...... it is silk crepe and is £14.50 a metre.......I loved it that much I didn't look at the cleaning instructions. It is dry clean only, I never buy shirt fabric that has to be dry cleaned, I am hoping I can get away with the handwash cylcle in the washing machine. It goes beautifully with the sage linen.

This is lovely fabric.....it is a little paler in real life. It is linen, has to be hand washed and was£14.50 a metre....I am hoping to make a lovely pair of summer trousers with this and on the left some more of that b.......y lining that I think is not going to work. To be fair the lining is breathable and has an ant-static finish. I suppose they are not bothered if it leaves water marks.


On Saturday I went shopping for some new fabric for the warmer weather, I wanted some nice shirt weight linen ......could I get some....NO, so this is what I bought.
This is brown needlecord..... £8.50 a metre, 100% cotton and washable at 30 degrees, this is for trousers for walking my dogs. I have some moleskin trousers but they are getting a little bit shabby, I saw some moleskin in the fabric shop in a country green, I was delighted but there wasn't enough on the role (moleskin fabric is like hen's teeth to find).
Next to the needlecord is a lighter brown lining......now this lining cost me an arm and a leg, £9.95 a metre. It is hand wash only and as I was coming into the house from the car it was raining and a few drops went onto this lining, the watermarks have stayed on the lining fabric.....I'm not amused I can tell you.

Tuesday 10 March 2009

Alterations

It actually doesn't look much different but I feel more comfortable in it and that is more important to me.


I didn't know what I had let myself in for and I don't know how many times I pulled buttonholes out that had gone wrong...ugh.... anyway the first 2 buttonholes were really tight .....I used my sensor buttonhole....until I realised I would have to use a bigger button in the back of my buttonhole foot to allow for the depth of the covered buttons, after that the buttons went through the buttonholes quite easily. I also used some fray check on them incase they started to fray.


I spent a good few hours changing the loops to buttonholes, which wasn't an easy task because there is only a double stitched small hem up the middle at both sides.


I thought about this for a few days before I actually did it because I was worried incase I spoilt it.....I thought I might be able to put an interfaced facing up the front......I decided the top of the interfacing would have a messy edge to it because I could not continue right round to the centre back because of the neck ties. I decided to put buttonholes onto the double hem at the front. I used a double thickness of stitch and tear.


I made this top , view C, sometime last year.....I have never been satisfied with it because of these


loops instead of buttonholes.....I have still worn it but I always felt that the middle gaped and looked untidy.


Friday 6 March 2009

Ready to go


These photographs never go where I want them to.....any way I have dressed myself to the best of my ability lol lol and OH has taken these photographs. I must admit I like this pair of trousers I have made and the silk lining feels lovely on my skin, lovely and ligt and airy. I hope when I have worn them there is no static, the silk has been washed and rinsed in fabric conditioner before I started to make these so hopefully it will be alright.


What is on the cards next? perfecting the fit of a tee shirt, I think, unless I change my mind of course.


Thursday 5 March 2009

Shoes

I have been on a shopping spree, well last week really.
Left is a beautiful red nail polish by Clarins, I also bought some tinted moisturiser which is a foundation ( I can't wear heavy make up) also from Clarins both were quite expensive but they will last me a while...if you keep your nail varnish in the fridge it will last a long, long time and won't go thick and awful.

I went to numerous shops looking for shoes....I didn't want high heels (they are alright if you are going out and just sitting) I wanted shoes that I could actually walk in and be comfortable. Could I find any? No in a word. Eventually after shopping for 3 days running I was successful.

These are the ballet shoes below, they are from M&S and are reasonably priced at £35.....they are really comfortable.


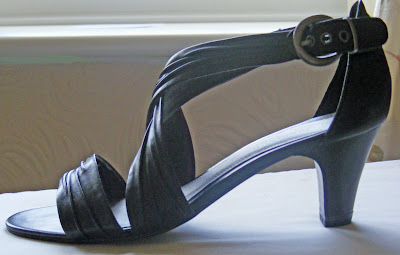
I absolutely love these sandals below.....they are from a Charles Clinkard outlet shop, the designer is Marco Tozzi. I saw these sandals and tried them on, they are very comfortable and the heel is just right for me......they are round about the £50 mark, but because it is an outlet shop they were reduced to £39.99. If however you bought 2 pairs of shoes you got the second pair for 25% off.....well I wasn't going to pass on a bargain.....I searched that shop high and low for another pair of shoes that I liked but I couldn't find any. What did I do?


Here you see below another pair the same only in a tan leather. These are also very comfortable and the sales assistant informed me if I had to have them heeled to make sure the person who is heeling them knows there is a shock absorber in the heel and not to remove it.


So all in all I was very happy with my purchases.

Wednesday 4 March 2009

At last they are finished


I have finished these trousers at last. I love this welt pocket but I practised it a few times before I tried it on my trousers.

To be fair to myself there are a few of the finer details that I had never done before so I spent at least 2 weeks trying to perfect them. I am really pleased with the fit of these, I have made them 3 times before but I always thought the legs were too wide. To get a better fit I took one inch seams instead of the usual 5/8 inch on the width of the legs and right through the hips and waist. I then narrowed the darts by 1/8 inch on all legs to keep the size of the waist the same.
I couldn't take a full picture of myself.....I didn't look my best lol lol
Back of trousers...I love the fit through the back and the way the welt pocket looks. I didn't put any belt loops on, I don't wear a belt and I don't suit clothes tucked in to my waist.

I also like the fit at the front and the crotch seem to fit better on these trousers than on the others.